The Peel and Stick Upgrade That Made My Rental Kitchen Look Custom (No Damage, Landlord Approved!)
Why Renters Need Custom Kitchen Solutions (Without Breaking the Rules)
I gotta be honest, most renters are stuck with kitchens that feel…basic. Like, just functional. Okay, essentials covered, but sometimes that’s not enough. You ever feel like your kitchen needs something more? You know, the kind of thing that makes it feel like yours? Yeah, I get it. Because remodeling? Usually costs an arm and a leg, and you can’t really do much without leaving permanent marks in a rental situation. So, what do you do? You get stuck with what you’ve got. Then I found this thing – peel and stick finishes – and it was a game-changer. Like, seriously life-changing stuff.
Meet Your Secret Weapon: Peel-and-Stick Finishes
What Exactly Are Peel-and (Peel-and-*) Stick Tiles & Finishes?
Alright, think of them as a secret weapon. For someone like me who wants a kitchen that feels custom, maybe even a bit fancy, without drama or damaging the place. You know what? They’re pretty much what they sound like: rolls, sheets, or those neat pre-cut tiles you can just…stick. The process is super simple: peel off the backing (usually just one corner to start) and slap them down on your existing surface. Honestly, it felt almost like magic, and I wasn’t the only one amazed by it.
The Magic Ingredients: Why They Work Well (Without Your Walls)
Now, I wasn’t expecting them to just magically stick forever, but the adhesive is designed cleverly. It sticks really well, I gotta say, but in a good way – without, you know, being glue that permanently bonds itself to everything (like wallpaper glue!). The best part? When you *do* need to take them off? They release cleanly. Zero residue, no sticky mess, no big gouges in the countertop or wall. Just peels off, leaving things as good as new. Seriously, that’s a total relief, especially when you know you might need to move or just change things up.
Benefits You’ll Love: The Rental Kitchen Makeover Advantages
It’s Custom & Looks Expensive (Without the Cost!)
Look, getting a custom look just blows. It elevates the vibe, makes the place feel yours, and adds that unique character. But the kicker? It doesn’t have to cost a fortune. Peel-and-stick finishes give that instant high-end look – you’re talking patterns, textures, maybe even some cool metallic finishes – and you haven’t spent thousands. It was amazing how much difference they made for someone on a budget like me. Totally worth it.
No Damage, Guaranteed: A Landlord’s Dream (and Yours!)
Here’s the biggest plus, honestly. These materials were gentle on my rental surfaces. No scratching, no discoloration, nothing like that. Plus, because they peel off clean? That’s your saving grace, and landlord’s too. You can do your thing, knowing you won’t cause any trouble when you leave. It avoids that nasty lease situation. Yeah, that’s a cool thing. You get to personalize without the guilt.
Easy Peasy Installation: Mostly!
So, how hard is it? Honestly, not that hard. Okay, maybe not completely brain-dead easy, but it’s way simpler than traditional tiling. Just clean the surface properly – no dust, grease, dirt anywhere – get some measurements, cut the stuff to size (a sharp utility knife is your best friend), peel carefully, and press it down flat. Voilà! No messy adhesives, no waiting forever, no expensive pro to hire. Just prep, cut, apply – sounds simple, yeah?
Step-by-Step: How I Did It (Installation Guide)
Planning Your Peel-and-Stick Project: Prep is Key (Seriously!)
Before you even think about putting a tile down, your surface prep is crucial. Clean! Smooth! Get it nice and tidy. Get rid of any dust, dirt, or grease, ’cause that stuff can really affect how well it sticks. I used a degreaser and wiped it down thoroughly. Let it dry completely. This step felt like it was 90% of the work, but it was vital for the finish and the clean removal later.
The Installation Process: From Prep to Peel & Stick
1. Measure Your Space: Get exact measurements, line it up perfectly – chalk lines can help visualize this stuff.
2. Cut to Size: Grab your sharp knife and carefully cut it out. A straight edge makes perfect cuts, trust me.
3. Peel and Apply: Carefully peel off the backing – go slow, maybe start at one corner or edge. Work quickly but gently. Press it down firmly as you go, maybe with your hand or a credit card to push out any bubbles.
4. Smooth Out Bubbles: Keep going, then use a plastic credit card or a putty knife (like for playdough) to gently drag over the surface. Start from the center and work outwards. This pushes out any trapped air and makes sure it’s flat and firmly attached.
Navigating Landlord Concerns: Getting Approval
The Conversation Starter: What to Tell Your Landlord (Be Honest!)
So, yeah, you need to communicate with your landlord. Have the talk. Be clear: this is a temporary, removable upgrade. Emphasize the “removable” and “no damage” parts. I wanted them to know I wasn’t planning anything permanent and wouldn’t cause issues. It’s about being responsible and transparent – landlords usually aren’t that bothered if you handle it right, I’ve found.
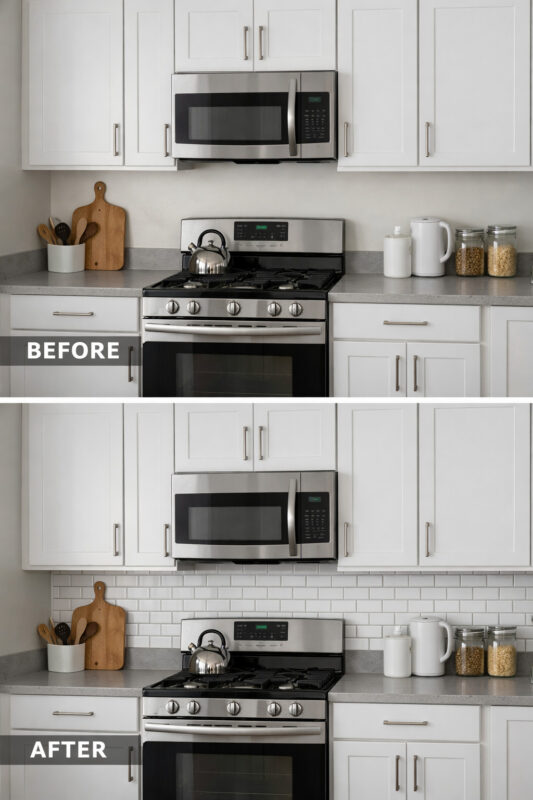
Showing, Not Telling: Documentation Is Your Friend Prepare a little visual proof.
Maybe snap some before and after pictures, showing how the rental kitchen transformed using peel-and-stick. Showing the clean removal shots too can be really helpful. It demonstrates it’s reversible and you’re being professional. I think visuals can really smooth things over and make the landlord more comfortable saying yes.
Maintenance & Removal: Keeping Your Rental Happy (Without Breaking a Sweat!)
Keeping Your New Look Sparkling: Simple Cleaning (Is That All?)
Keeping it clean is a breeze. Just use gentle, non-abrasive cleaners and soft cloths or paper towels. No need for harsh stuff that could damage the finish or the adhesive. A quick wipe-down usually keeps it looking great. Seriously, it’s low-maintenance.
The Big Reveal: How to Remove Without a Trace (It’s Easy!)
Time to swap it out or try a new look? No sweat! Just peel it off in manageable sections. It’s surprisingly easy. And the best part? It should leave absolutely no trace – no sticky residue, no damage. You end up with a surface that looks almost brand new again. That’s the whole point, isn’t it?
So yeah, that’s my story. I took a rental kitchen from basic to basically feeling like my own place, all with peel-and-stick finishes. No damage done, landlord gave the okay, no problem at all.
Thanks for reading and happy upgrading!